Beauty & Wellness Forms · Sep 18, 2026 · 18 min read
Waxing Forms Setup: Screen the Visit, Map Treated Areas, and Hand Off Aftercare
A practical setup for the waxing forms pack: confirm the PDF and Word files, give every client and visit a stable identity, finish intake before the wax is heated, match screening and consent to today’s areas, keep a treatment record the next visit can read, and hand off pre-care and aftercare as their own step.
Confirm what the current download includes
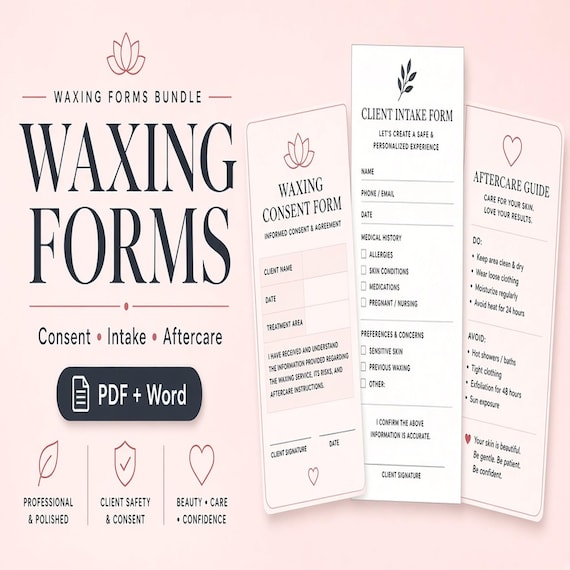
Start with the files the current listing actually describes. The SteadyStackStudio Waxing Forms Bundle is a digital template kit for estheticians, waxing specialists, and salon owners who need client intake, consent and screening, pre-care and aftercare, and a treatment-record sheet without building those pages from a blank document. The listed contents are a waxing client intake form, a waxing treatment consent / screening form, a pre-care and aftercare card, a client treatment record sheet, editable Microsoft Word DOCX files, printable PDFs, and a quick-start guide. It is an instant digital download in a ZIP. No printed binder, clipboards, wax, applicators, or aftercare products ship.
Open the unzipped folder and compare it with that list before a live client writes on a page. Confirm you received both printable PDFs and editable Word files. This page does not add Excel, Google Sheets, electronic signatures, a booking calendar, a body-map app, or a compiled client database. If a README, license note, or quick-start guide is in the folder, read it before you print a client-facing page or duplicate the files for a second room.
The listing is explicit about scope. These pages help you organize waxing paperwork. They are templates only. They are not legal, medical, licensing, insurance, or compliance advice, and they do not replace training, a reviewed studio policy, or a professional who can check wording for your location. You remain responsible for customizing every page for the services you actually offer and for the rules that apply to your studio. Single-buyer, single-business use inside your own practice is the usual digital-download rule. Do not resell, share, or redistribute the raw template files.
- Verify the ZIP against the listed intake form, consent / screening form, pre-care and aftercare card, treatment record sheet, Word files, PDFs, and quick-start guide.
- Confirm PDF plus Word. Do not expect Excel, Google Sheets, or a booking app.
- Read the quick-start guide and any license note before a second person prints from the working copy.
- Treat the pack as editable waxing paperwork, not as a shipped kit or a legal service.
Decide whether waxing paperwork is the missing job
This pack fits when the friction is the hair-removal record, not the service menu. A price list, a social post, or a wax warmer already running does not record who sat in the chair, which areas were planned, what the skin looked like today, or what aftercare left with them. The useful question is not “does the cover look like a spa.” It is “can one client, one visit, one screening conversation, one treated-area note, and one aftercare card travel together without living in a texts thread and a sticky note on the wax pot.”
It also fits when the studio already books waxing and still loses the paper trail. Independent estheticians and small rooms often keep last-wax dates in a message, area notes in a calendar comment, and aftercare as a spoken reminder at the door. That works until a client returns in four weeks, a product they started last Tuesday matters, or nobody can find which side was skipped. A printed PDF at the table plus a Word copy you can rewrite for your studio name is a better match for that job than a generic beauty waiver with no treatment record.
Skip this pack, or use it only as a neighbor, if the real need is a facial with a skin-analysis worksheet, lash extensions, brow lamination, lash lift, spray tan, body contouring, or PMU color notes and touch-ups. Those visits have different wording and different aftercare. Skip it if you only wanted an injectable packet, an online form builder, or a shipped client book. Choose the smallest complete download that matches the missing job. If the studio needs facial, wax, brow, lash, and PMU kits in one ZIP, compare the esthetician mega bundle instead of stretching this waxing pack.
- Use this pack when waxing intake, visit screening, treated-area notes, and aftercare are the gap.
- Use it when a clipboard page and an editable Word file need to describe the same hair-removal visit.
- Do not expect a booking app, electronic signatures, injectables paperwork, or a shipped client book.
- Do not buy it first if the real need is facial skin analysis, lashes, brows, spray tan, PMU, or a multi-service mega kit.
Protect the masters and make a working copy
Download the ZIP once, unzip it into a folder you will not edit, and duplicate that folder for daily work. Name the master something obvious, such as original-waxing-treatment-forms, and leave it closed. All studio-name changes, printed tests, and sample clients happen in the working copy. If a print-margin experiment clips a signature line or a screening heading is overwritten, you still have the listed files.
Keep the two formats in their roles. Print the PDF when a page has to travel on a clipboard, in a guest folder, or to a second room. Edit the Word file when your studio name, service list, area names, pre-care reminders, or aftercare wording need to match how you actually talk to clients. Do not treat the PDF as the only record if the Word file is where you keep the current wording. Do not invent a third unofficial version in a notes app that uses different headings.
Write a one-line use note in the working folder: internal desk sheet, client-facing consent page, or combined visit packet. That note stops the same file from being handed to a guest on Saturday and used as a private follow-up log on Sunday without a fresh review. Finished-studio use is not the same as redistributing the raw pack. If more than one esthetician will print from the files, keep one working copy and a short rule about who may change headings.
- Unzip once, keep a locked master, and edit only a duplicate.
- Use PDF for a traveling page and Word for studio-specific wording.
- Write the intended job on the working folder so the same files are not reused blindly.
- Follow the listed license: studio use is not the same as reselling the raw pack.
Give every client and every visit a stable identity
A consent page is useless if nobody can tell which visit it belongs to. Before the first live wax, decide how a client will be named and how a visit will be named. A client identity can be as simple as a full name plus a short code, such as rivera-04. A visit identity can be the date plus the room or esthetician, such as 2026-09-20-am. Write the same identity on the intake form, the screening and consent page, the treatment record, and the aftercare card.
List what the visit actually is, not a marketing package name. “Smooth package” does not help a later follow-up. “First visit, underarm and bikini line, no face wax, client reports a new home retinol” does. Include the pieces that disappear in conversation: which areas were requested, which areas you agreed to do, whether any area was postponed, and whether aftercare left as a printed card or a spoken reminder. If those details do not have a home on the record, they will not be there when the client returns.
Put a current-status word on the visit as soon as it exists. Useful first words are inquiry, booked, intake-complete, screened, in-progress, complete, aftercare-sent, postponed, and closed. Pick a short list and do not invent a new word for every appointment. The printed packet is the place for that identity when the person at the table cannot open a laptop. If you later add a simple date log in your own notebook, use the same visit identity there instead of a second nickname.
- Give each client and visit a short identity that appears on every page in the packet.
- Record the actual areas and today’s decision, not only a menu nickname.
- Use a short status list such as booked, screened, complete, aftercare-sent, postponed, and closed.
- Do not keep a second unofficial list in messages that uses different names.
Finish intake before the wax is heated
The intake form is the first working page, not a formality to rush while the wax reaches temperature. Ask the client to finish it before you commit to today’s areas. Intake is where contact details, visit goals, last wax or other hair-removal method, known sensitivities, current home products, recent treatments, and anything the client wants you to know should land. If those answers arrive after you have already opened a pot for the face, you are guessing.
Read the completed intake out loud in short pieces, not as a silent scan. Confirm the visit goal in one sentence the client can hear: brows only, underarms, a first full-leg visit, or a return bikini wax. Confirm what has changed since any previous appointment, especially a new product, a new medication they choose to report, recent sun, or a reaction after the last wax. If a line on the template does not match how your studio talks, change that line in the Word file before the next client, rather than scribbling a private code in the margin.
Do not copy an unrelated medical-spa questionnaire onto a waxing intake if you are not offering that kind of service. This pack is waxing treatment paperwork, not a diagnosis form, an injectable chart, or a chemical-peel packet. Record what you need in order to decide whether today’s hair removal should proceed, then stop. Collect only the details you will actually review. If a client’s answers mean you should not proceed, write that decision on the same visit identity instead of starting a service you will later have to explain from memory.
- Finish intake before you heat wax for today’s areas.
- Confirm visit goal, last hair-removal method, home products, and reported changes in the client’s hearing.
- Edit Word headings to match your studio language rather than inventing margin codes.
- Do not stretch this intake into diagnosis, injectables, or a service you do not offer.
Keep screening and consent as two jobs on the same visit
Consultation gathers information. Consent records the client’s decision after you have explained today’s plan. The listed pack includes a waxing treatment consent / screening form. Use that page to hold both jobs without letting them blur. Screening is where you review what the client reported and what you can see on the skin. Consent is where the client agrees to the service you actually named, not to a menu of every wax in the building.
Walk through screening in plain language after intake, while you can still postpone. Ask about the products and reported history your training already requires you to review for hair removal. Look at the skin you plan to wax. Do not wax over skin that looks compromised on this visit. If your training, product instructions, insurer, or local rules call for extra caution around certain medications, recent procedures, or active products, customize those questions in the Word file so they match what you will genuinely act on. This download does not ship a medical protocol, a wait-time chart, or a diagnosis tool. It gives you editable pages so the questions you already ask are not left in a verbal-only habit.
Have the client review the consent portion after you have named the plan, not before you have looked at the skin. A signature on a blank-looking waiver at check-in does not help if the areas changed once you saw irritation, sun, or a new product. Walk through the parts that matter: which areas you will wax, what they should tell you during the visit, and what aftercare they will take home. If they ask to skip an area, write that change on the same visit identity. Customize the wording for your services, then have someone who understands your local requirements review it before you rely on it with paying clients.
- Use screening to review reported history and today’s skin; use consent for the service you named after that review.
- Look at the treatment area before you apply wax, and postpone when the skin is not ready.
- Customize Word screening questions to match the checks your training already requires.
- Let the client review the plan, not only a check-in signature.
Map the areas you will actually wax
Name the areas in words a colleague could reread in four weeks. “Bikini, client’s left side lighter growth, no inner thigh today” is usable. “Regular” is not. If the template has lines for service details, use those lines. If you already use a simple area list in your studio, edit the Word file so the same names appear on intake, consent, and the treatment record. Do not invent a second map on a sticky note because the sheet felt too formal.
Connect the area list to the screening instead of starting a new story. If intake said they started a new home acid last week, that belongs next to any facial or body area you were about to wax. If they have an event in two days, that belongs next to the plan, because it may change how you talk about redness and aftercare. The area list is a map for this appointment. It is not a promise that every future wax will follow the same combination.
Keep face, body, and intimate-area visits honest about which packet they belong in. A brow wax is still a waxing visit, but it is not the same conversation as a Brazilian. If your studio uses different pre-care or aftercare language for those visits, keep both versions in the working folder with clear file names rather than handing the wrong card. Do not stretch this pack over a lash, brow-lamination, or PMU appointment because the client is already in the chair.
- Write the actual areas and any skipped side on the same visit identity.
- Tie today’s area list to products, last wax, and screening notes from intake.
- Keep separate aftercare wording for visits that are not the same service, using clearly named Word copies.
- Do not keep a second unofficial area map on a sticky note.
Keep a treatment record the next visit can read
The listing includes a client treatment record sheet. Use it as a short log of what happened, not as a second intake. After the wax, write the visit identity, the areas you completed, the products or wax type you actually used if that is part of your studio habit, how the skin looked at the end, and anything the client reported during the appointment. A later you should be able to read it without decoding.
Keep the record with the screening page. If last month’s notes say you postponed an area, this month’s visit should see that line before you repeat it. If the client bought an aftercare product, write the name they left with. If they need a follow-up or a longer interval, write a date rather than “soon.” The record is for continuity. It is not a place to rewrite the full consent page or to store payment details that belong in your ordinary checkout process.
If your studio patch-tests a new product or a first-time client, write the product, timing, result, and decision on the treatment record or on the screening page you already have. The listing does not include a separate patch-test form. A checkbox that only says “tested” cannot explain what was tested. If more than one esthetician might see the same client, agree on a few boring headings and stick to them: date, visit identity, areas, products used, client comments, next visit. The files you received are paper and Word pages. They do not sync across devices. The filing rule you choose — one folder per client, or one packet per visit stored by date — matters more than a decorative cover.
- Log completed areas, products used, and client comments on the same visit identity.
- Keep the treatment record next to the screening page so return visits can find it.
- If you patch-test, write product, timing, result, and decision instead of a bare checkbox.
- Use short shared headings if more than one person will reread the file.
Hand off pre-care and aftercare as their own step
The listed pack includes a pre-care and aftercare card. Treat both sides as a handoff, not as a line you mention while walking the client to the door. For a first visit or a new area, send or print the pre-care side before the appointment when you can, so the client is not hearing “stop that product” after they have already applied it. For every completed visit, give the aftercare side before they leave. If you also say the reminders out loud, still send the card. Spoken-only aftercare disappears.
Edit the Word version so the reminders match the wax you actually did. A brow wax and a body wax should not share leftover sentences that no longer apply. Keep the card short enough to read. What to do for the rest of the day, what to avoid until the skin has settled, when to resume a strong home product if that is part of your studio advice, and how to reach the studio if something does not look right are usually enough. Do not turn the card into a full retail catalog.
Record that the card left with the client. A one-word note such as aftercare-sent on the visit packet is enough. If you later text a reminder, use the same visit identity in your own log rather than starting a new unofficial aftercare story. Photo-use permission, if you ask for it at all, should stay a separate choice. A client may be comfortable with a private progress photo and not want it on social media. The listing does not include SMS software, an automated drip, or a photo-release platform. The card is the handoff the files actually give you.
- Give pre-care before a new visit when you can, and give aftercare before the client leaves.
- Edit the card so it matches today’s areas, not a leftover menu.
- Keep the card short: what to do, what to avoid, and how to reach you.
- Mark aftercare-sent on the same visit identity, and keep any photo permission as a separate choice.
Run one practice client before a live wax
Before a paying client uses the packet, run one fictional visit from start to finish. Choose a made-up name, fill the intake, complete screening, name a simple area plan, fill the consent portion, write a treatment record, and hand yourself the aftercare card. Include one postponed-area version so you practice writing “not today” instead of leaving a blank. Time it. If the packet takes longer than the greeting window you actually have, cut duplicate questions in the Word file rather than skipping pages on the first live day.
Print one test set at the size you will use at the table. Check margins, signature lines, and whether the treatment record still has room after a normal amount of handwriting. If a heading wraps badly or a card feels too crowded, fix the Word file and reprint the test. Do not discover a clipped line while a client is waiting. Keep that test packet in the working folder as the example of a complete visit, including the postponed version.
Write a one-page studio rule next to the working copy: which pages the client completes, which pages you complete, where finished packets are stored, how long you keep them under your own retention rule, and who may change wording. The files do not create that rule for you. A short rule plus an untouched master is the method that matches a PDF and Word kit. If the practice run shows you also need facial, lash, brow, spray-tan, or PMU pages, stop and compare those downloads instead of rewriting waxing headings until they pretend to cover every service.
- Walk one fictional client through intake, screening, consent, treatment notes, and aftercare, including one postponed area.
- Print a test set and check handwriting space before a live visit.
- Write a short filing, retention, and wording rule next to the working copy.
- Compare a neighboring kit if the practice run reveals a different service gap.
Who this fits and who should skip it
This setup fits estheticians, waxing specialists, and small salons that already take hair-removal appointments and need one consistent path from intake to aftercare. It is especially useful when first visits and return waxes share the same room and the same people. A PDF page that can sit on a clipboard and a Word file you can rewrite for your studio name match that rhythm better than a long waiver nobody files.
It is a weaker fit if the studio already runs a complete client-record system and only wanted a decorative cover page. It is also a weaker fit if the real gap is another service: facial skin analysis, lash extensions, brow lamination, lash lift, spray tan, or PMU. Those jobs live in their own form kits. Keep this pack for waxing intake, visit screening, treated-area notes, and aftercare. Use the mega bundle when the missing job is several of those kits in one download.
Choose a neighboring kit when the visit is not a wax. Facial intake and skin analysis, lash intake and aftercare, brow and lash-lift paperwork, spray-tan and body-contouring forms, and PMU color notes and touch-ups are separate downloads with separate wording. Do not stretch waxing consent language over those visits. The related product pages exist so you can compare the closest kit instead of rewriting this one into something it is not.
- Good fit: appointment-based waxing rooms that need intake, screening, treated-area notes, and aftercare in one kit.
- Weaker fit: shops that already have a complete record system, or buyers who only needed another service’s forms.
- Use the facial, lash, brow, spray-tan, PMU, or mega kits when those visits are the real job.
- Keep waxing paperwork and other beauty services as linked records, not one mixed waiver.
Before you click through to Etsy
Use the SteadyStackStudio product preview as a final check. Confirm the title, price, file type, preview image, and related downloads all point to waxing intake, consent and screening, a treatment record, and pre-care and aftercare. If the recommended product looks close but not exact, compare the facial, lash, brow, spray-tan, PMU, or mega-bundle pages in the same topic hub before leaving the site. A good match should show printable PDFs and editable Word files, not a shipped binder and not an injectable packet.
Once the product page and Etsy listing agree on what is included, the Etsy click is the checkout step rather than a blind jump. Answer the paperwork question first, compare the matching download second, then use Etsy only when the fit is clear. After checkout, run one fictional client through intake, screening, consent, treatment notes, and aftercare before a live wax uses the pages. Ask returning clients what has changed before you reuse last visit’s answers. Preserve an old signed page rather than editing it to look current.
This page is a comparison and setup step, not a promise that every download will fit every studio, printer, device, or professional requirement. For consent, health, safety, or legal-adjacent use, review the final wording against your local requirements before relying on it. The files help you keep a clearer record. They do not replace professional judgment, training, or a reviewed studio policy.
- Check the preview images and file details before opening Etsy.
- Choose the smallest complete download that solves the real job.
- Use related product pages when another service’s paperwork fits better.
- Review the final wording against your studio rules and local requirements before a live client uses it.
Printables used in this guide
Instant downloads from the SteadyStackStudio Etsy shop.
Waxing Forms Bundle
Waxing treatment forms bundle for estheticians, waxing specialists, and salon owners who need clean client intake, consent…
Facial Consent Form Bundle
Facial treatment forms bundle for estheticians and skincare studios: 26-page fillable PDF with skin analysis, client intake…

Lash Tech Consent Forms
Lash tech forms bundle for lash artists and beauty studios: 26-page fillable PDF with consent, client intake, contraindication…
Spray Tan Forms
A practical digital template bundle built around an urgent buyer need: Editable-style printable forms for intake, consent…