Tattoo Flash · Oct 7, 2026 · 13 min read
Halloween Flash Sheet Setup: Plan a Seasonal Menu and Print One Motif at Size
A practical setup for tattoo artists, apprentices, and flash collectors who need a short Halloween walk-in menu rather than a year-round nature sheet. Confirm the three JPG sheets, three matching PNG copies, and README, then print one motif at the width you will actually discuss.
Name the seasonal job before you open a year-round sheet
A Halloween flash sheet is a short menu, not a year-round portfolio. Before you download anything, write the job in one sentence: a walk-in window, a flash day, a studio display, or a private idea book. Then write the dates that menu should stay up. A ghost, bat, or pumpkin mark can look right in late October and out of place on a January consult board.
If the person in the chair wants a mountain, a coastline, or a birth-month flower, stop here. Those requests belong on the nature flash fit check, not on a seasonal spooky sheet. If they want party stickers, classroom pages, or a card set, a clipart pack is the closer tool. This download is artwork sheets for tattoo planning, studio display, and printable reference.
Write the placement and the width they named, even if the number is rough. "Small on the forearm" is not a size. Hold a ruler against the area, or cut a paper strip to the widest mark they will accept. One inch changes how a fine-line motif reads, so do not guess from a phone preview.
- Name the window: walk-in night, flash day, or private idea book.
- Write the dates the menu should come down.
- Record a width in inches or centimeters before you print.
- Send mountain, ocean, and birth-flower requests to the nature fit check.
Confirm the current file list, and nothing beyond it
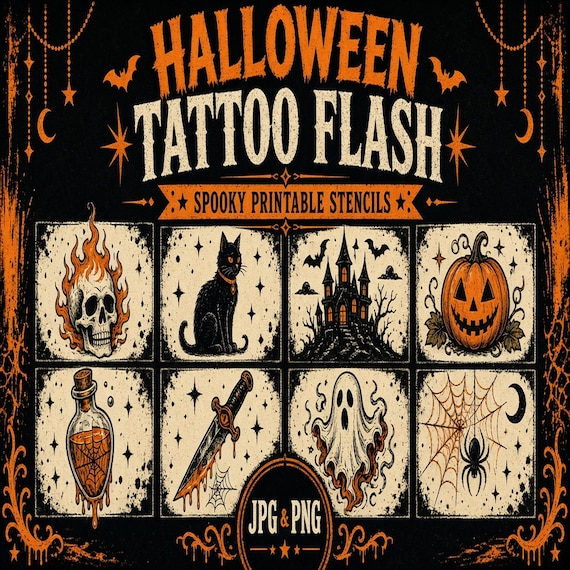
Read the file list on this product page. Do not borrow it from a neighboring pack. The current Spooky Halloween Tattoo Flash Sheets describe three high-resolution printable JPG tattoo flash sheets, three high-resolution PNG exports of the same finished artwork, and a simple README or license note. It is an instant digital download. No printed flash, stencil paper, or transfer ships.
The page describes the sheets as fine-line tattoo inspiration, stencil references, studio displays, client consults, mood boards, and printable art collections. The themes named there are spooky, Halloween, ghost, bat, and pumpkin. That is a theme list, not a promise that every sheet contains every motif, and not a count of how many ghosts, bats, or pumpkins appear. Count only what you can point to on the current preview.
There is no compiled PDF in this file list. Do not expect one because another flash pack includes a PDF. The PNG files are exports of the same finished sheets, not a claimed set of separate transparent cutouts. SVG files, vector files, and individual icon crops are not included.
- Current package: 3 JPG sheets, 3 matching PNG exports, and a README.
- No PDF, SVG, vector file, or individual cutout library is listed.
- Ghost, bat, and pumpkin are themes. Count what you can see on the preview.
- No physical sheet, stencil paper, or transfer ships.
Match the request to a motif you can see, or choose a different download
Open the preview before you assume a specific drawing is inside. Point to the motif you would actually offer. If you cannot see a clear ghost, bat, pumpkin, or other spooky mark at a useful size, do not tell a client it is in the pack. A theme word on a product page is not the same as a drawing you can crop.
Use these sheets when the menu should stay seasonal and the drawing should read as a small Halloween mark you can already see. Use them for a studio display or a short walk-in board. Do not use them as a substitute for a custom portrait of a costume, a pet, or a face.
Choose a different download when the request drifts. Party stickers, labels, and classroom pages fit the cute ghost and witch clipart sheets, which are artwork sheets for printables rather than a tattoo consult board. A large coded menu of many separate tiny designs fits the tiny fine-line library, not three finished sheets. A moon-and-floral witchy mark that should stay up after October fits the witchcore botanical sheets. A sun, moon, or star with no Halloween theme fits the celestial sheets. A mixed patch of unrelated small icons, with skin left between them, fits the patchwork sheet setup.
- Point to the motif on the preview before you promise it.
- Keep this pack for a seasonal menu you can see on the sheets.
- Move stickers and cards to the ghost-and-witch clipart sheets.
- Move a large separate-icon menu to the tiny fine-line library.
Keep the Halloween menu short and dated
Three sheets are enough for a short menu. They are not enough for an all-day flash event that needs a code for every drawing in the shop. Pick the motifs that still read at the size you will offer, and leave the rest off the board. A crowded page of every spooky idea you own is harder to choose from than four clear options.
Write a simple menu card that matches what you printed. Include the name you will say out loud, the width you tested, and the last date the offer applies. Do not invent menu codes that are not printed on these sheets. If the event needs codes for a large walk-in, use a pack built as a coded library and follow that workflow instead.
Take the board down when the window ends. A Halloween sheet left on the wall in December trains people to treat a seasonal file as a permanent catalog. Store the printed board with the date on the back. Reuse it next year only after you recheck the current file list, because a download page can change.
- Offer only motifs you have printed at the offered size.
- Date the menu. Do not leave it up as a year-round wall.
- Do not add codes the sheets do not contain.
- Recheck the product page before you reuse last year's print.
Protect the masters and make one working copy
After download, unzip into a folder you do not edit. Name it with the product title and the download date. Copy the three JPG sheets and the three PNG exports into a working folder. Crop, resize, and annotate only the copies. If a later print looks wrong, you still have the untouched files to start again.
If a ZIP will not open, download it again from the purchase receipt before you assume a file is missing. Three JPG files, three PNG files, and a README are the whole package. A missing PDF is not a missing file. A missing JPG or PNG is.
Keep the README in the master folder. The product page says personal use and small commercial use are welcome for finished projects unless the included README says otherwise, and that the original download files should not be resold, shared, or redistributed as-is. Read the note you received. Do not rely on this summary in place of that note.
- Keep an untouched master folder named with the download date.
- Edit only copies.
- A missing PDF is expected. A missing JPG or PNG is not.
- Read the included README before anyone else sees a sheet.
Use a JPG for the board and a copied PNG for one crop
The JPG sheets are the straightforward print for a consult board. Open one at 100 percent and look at the whole page before you crop. Note which motifs share a sheet so you do not offer a drawing that is only a corner of a larger composition. If two marks overlap or share a border, treat them as one sheet design until a crop proves they can stand alone.
The PNG exports are the same finished artwork. They help when you need to place one sheet over a neutral background in a layout app. They are not a promise of transparent individual icons. If a background remains, crop a working copy and leave a margin. Do not spend the afternoon trying to cut every ghost into its own file.
If the job needs separate transparent icons for stickers, labels, or a coded digital menu, this is the wrong package. Say that before you buy a second copy hoping the files will be different. The file list will still be three sheets and three matching exports.
- Print the consult board from a JPG sheet.
- Use a PNG copy only to crop a reference, not to build a cutout library.
- Leave a margin around any crop.
- Stop if the job needs individual transparent icons.
Print one motif at the width you will actually discuss
Measure the body area with a ruler, or cut a paper strip to the largest width the person will accept. Write that width down. Then print the chosen motif at that width, plus one size smaller and one size larger. A two-inch request is not settled by a two-inch print alone. The smaller and larger copies show how much the drawing changes when the width moves by a small amount. Artists who print a requested size often add those neighboring sizes so the person can compare them on paper, not on a screen.
Print on ordinary paper first. This test is about size and line, not about transfer paper. Scale by the motif, not by the full sheet. A sheet scaled to fit a letter page can shrink a pumpkin until the stem disappears, or enlarge a corner ornament until it no longer matches the menu. Note the print scale in the file name, such as the motif and the width, so the next print matches.
Check the paper against the ruler before you show it to anyone. If the printed width does not match the number you typed, fix the scale. A phone preview is not this test. Hold the passing strip against the placement, with the person's permission, and ask whether that width is the one they mean.
- Measure the placement, then print that width plus one size each way.
- Scale the motif, not the whole sheet to the page.
- Confirm the printed width with a ruler.
- Save the test with the width in the file name.
Check whether the lines still read at that size
Hold the print at arm's length, then at the distance a person will use to look at their own arm or ankle. A fine line that looks crisp on a monitor can break into dots on paper. Look for a stem, a wing edge, an eye, or a small opening inside a pumpkin that closes up when the motif shrinks. If you cannot name the motif from across a table, it is too small for a walk-in board even if it still looks clever on your screen.
If the smaller size fails, do not offer that size on the menu. Raise the minimum width or choose a simpler motif from the same sheets. If every motif fails at the size the walk-in crowd expects, this pack is a display reference, not a tiny-flash menu. The tiny hand-and-finger sheets, or the large tiny-icon library, are the closer tools for marks that must stay very small.
Circle the size that still reads and write "offer" on that print. Cross out the size that collapsed. Those two marks keep a busy front desk from handing someone the wrong strip. Photograph the marked print with the menu card so the person working the desk has the same reference you used.
- Check eyes, wing edges, stems, and inner shapes, not just the outer outline.
- Do not offer a width that failed the paper test.
- If every motif fails at a tiny size, switch tools.
- Mark the passing print so the desk cannot grab the wrong one.
Treat the word stencil as a label, not a finished transfer
This product page uses stencil to describe reference sheets and inspiration. It does not include stencil paper, a thermal transfer, or a ready-to-apply drawing. A cropped PNG is still a picture of a sheet. Putting linework onto transfer paper is a separate studio step, done later, at the size already chosen. This download does not do that step for you.
If someone asks whether they can press the paper size test onto skin, the answer is no. The test print is for comparison. It is not a transfer, and it is not a substitute for the artist's own stencil process. Do not trace the test onto skin, and do not hand it over as if it were approved linework.
Keep consent and aftercare in their own paperwork. A Halloween menu does not change intake, deposits, or aftercare. If the shop needs those pages, use a consent and aftercare form set rather than writing policy in the margin of a flash sheet. The artwork choice and the paperwork choice are two different downloads.
- A sheet described as a stencil reference is still a reference, not a transfer.
- Do not press the size-test print onto skin.
- Keep consent, deposit, and aftercare on their own forms.
- Leave line changes and placement edits to the artist doing the work.
Read the license before a sheet leaves your desk
The product page says some artwork was made with seller-directed image tools, then selected, formatted, and packaged as finished files. Review the actual sheets. If a motif looks wrong for your shop, leave it off the menu. You are not required to offer every drawing in the file. A short menu of marks you would actually tattoo is more useful than a complete print of a sheet you do not like.
Personal use and small commercial use for finished projects are described on the product page, unless the included README says otherwise. That is not permission to resell, share, or upload the original JPG and PNG files as another digital pack. A printed consult board in your studio is a different use from handing the ZIP to another artist or posting the sheet files for download.
Colors can shift between a monitor, a phone, and a desktop printer. The paper test is the line check that matters. Do not promise a black that your printer cannot hold. If the desktop print looks gray or broken, fix the print settings or raise the size before you put that sheet on the board.
- Review the finished sheets and drop any motif that does not fit the shop.
- Do not redistribute the original files.
- A studio print is not permission to share the ZIP.
- Judge line weight on paper, not on a phone screen.
Skip this pack when the job is stickers, a symbol, or a coded menu
Skip it when the buyer wants cute Halloween stickers, labels, or party pages. The ghost-and-witch clipart sheets are built for that printable work, and they still need their own file check before you print a sticker run. Skip it when the mark should be a moon-and-floral drawing that stays relevant after October. Skip it when the board should be suns, moons, and stars with no Halloween theme. Skip it when the event needs dozens of separate transparent icons and menu codes.
Also skip it when the person wants a portrait of a specific costume, pet, or face. These are finished flash sheets, not a custom drawing service. Skip it when you need a PDF booklet to hand out. This package does not list one. Skip it when the consult is a mountain, a coast, or a birth month. That fit check already exists, and forcing a pumpkin sheet into that conversation wastes the appointment.
If you already downloaded the files and the preview does not match the request, stop using them for that consult. A wrong sheet on the table creates a longer correction than an honest "this pack does not include that."
- Stickers and party pages: ghost-and-witch clipart, not these tattoo sheets.
- Year-round symbols: witchcore botanical or celestial sheets.
- Coded tiny menus: the separate fine-line library.
- No custom portrait and no PDF booklet in this file list.
Run the seasonal-menu check before you open the product page
Use this pass before you buy, and again after the files arrive. It takes less time than reprinting a board that was scaled to the page instead of the motif.
Write the dates of the walk-in window and the width you will offer. Confirm the current list: three JPG sheets, three PNG exports of the same artwork, and a README. Expect no PDF and no cutout library. Point to a ghost, bat, pumpkin, or other spooky motif on the preview. If you cannot see it, do not promise it.
Copy the masters. Print one motif at the offered width, plus one size smaller and one size larger. Keep only the size whose lines still read, and mark that print. Leave consent and aftercare on their own forms. Do not treat the paper test as a transfer. Date the menu and plan the day it comes down. If any step fails, do not force this pack to do another product's job. The nature flash fit check, the tiny flash-day workflow, and the clipart file check are already written for those other jobs.
- Date the window before you compare previews.
- Print one motif at three widths and keep the size that reads.
- A paper test is not a stencil and not a consent form.
- Take the seasonal board down when the window ends.
Printables used in this guide
Instant downloads from the SteadyStackStudio Etsy shop.
Halloween Tattoo Flash Sheet
I built these spooky Halloween tattoo flash sheets for fine-line and traditional artists who need ready-to-print ghost, bat, and…
Halloween Clipart PNG Bundle
A polished digital artwork bundle for Halloween printable sellers, teachers, sticker makers, party planners, scrapbookers, and…
Fine Line Tattoo Flash Sheet Bundle
Tiny Fine Line Tattoo Flash Bundle — 128 minimal designs in one instant-download pack. A practical gift for a tattoo artist or…
Patchwork Tattoo Flash Sheet Bundle
I built this patchwork tattoo flash sheet bundle for studios that need ready-to-print mixed motifs for flash-day walls without…